
360 Hair
A.M. Williams
A.S.P Kitoko
Adore
Affinage
Agadir
American Barber
Andis
Angel Extensions
BaBylissPRO
Belmacil
Berrywell
BINACIL
Bodyline
BODYOGRAPHY
Bondi Boost
Bronsun
Caflon
Caronlab
Clever Curl
Color On
ColorDesign
CPR
Crazy Color
Cristalli Colour
De Lorenzo
Dikson Colour
Dispel
DuBoa
Eco Style Project
Elite Cosmetics
Elleebana
EuroStil
EverEscents
EVA Professional
EVY Professional
Excellent Edges
Feather
Fluid
Framar
Fudge
Gelish
GirlBoy
Glazette
Glide Hair Tools
Global Scissors
H2D
Handy Foil
Hi Lift
Indola
Invisibobble
Jaguar
Jax Wax
Joico
Juuce
Keracolor
Keratherapy
Keratin Colour
Kiepe
Krest
KSHE
Le Marque
Lisap
Locks Lash
L'Oreal
LuminArt
Lycon
Malibu C
Mancine
Matrix
Milani
Milkshake
MineTan
Modern Pirate
Morgan Taylor
MoroccanTan
MUVO
NAK Hair
Natural Look
Nature's Purity
OKM
Olivia Garden
OPI
OzTan
Parlux
Paul Mitchell
PRAVANA
Pro-One
Punky Colour
Pure Brazilian
Pure
Pure Identity
Real Care
Redken
RefectoCil
Revita
Riffi
Rockstar
ROUX
RPR Haircare
Salon Only
Salon & Spa
Salon Perfect
Schwarzkopf
Silver Bullet
Sterex
Summer Kiss
Summer Tan
Swedish
Tangle Teezer
Tanning Essentials
Termix
Theorie
Titania
Wahl
Wavol
Wella
WetBrush
White Sands
Young Nails
Zotos
Lash & Brow Tinting
Lash & Brow Dye
Brow Henna
Lash & Brow Tint Remover
Lash & Brow Kits
Wands & Brushes
Lash Undereye Protection
Lash Lift Lotion
Lash Lift Adhesive
Lash Lift Kits
Lash & Brow Lamination
Lash Treatment
Lash Tools & Accessories
Bed Rolls
Bed Cover Sheets
Bras
G-strings & Boxers
Gloves
Wax Spatulas
Wax Strips Pre-cut
Wax Strip Rolls
Wipes
Acrylic Liquid
Acrylic Powder
Dappen Dishes
Gelish Dip Powder Colours
OKM Dip Powder Colours
OPI Dip Powder Colours
Nail Dipping Pre & Post
Nail Polish Gel
Gelish Gel Colours
OPI Gel Colours
Gel Pre & Post
Remover Wraps
Polish Remover - Acetone
Nail Polish Lacquer
OPI Polish Colours
OPI Infinite Shine Colours
Morgan Taylor Polish Colours
Faby Polish Colours
Polish Pre & Post
Polish Remover - Non Acetone
Nail Files
Foot Files
Corn Cutters
Nail Clippers & Nippers
Nail Lamps
Nail Drills
Nail Drill Bits
Bowls & Containers
Nail Polish Colour Displays
Mannequins
Safety Glasses
Nail Wipes
Gel Removal
Nail Pad Protectors
Sanitiser
Disposable Slippers
Toe Separators
Foot Files
Nail Files
Polish Remover - Acetone
Polish Remover - Non Acetone
Nail Polish Quick Dryers
Disinfectant
Sanitiser
Bowls & Containers
Isopropanol Alcohol
Bed Rolls
Bed Cover Sheets
Conductive Gel
Demineralised & Distilled Water
Bras
Disposable Slippers
Disposable Underwear
Gloves
Caps & Hair Nets
Swabs & Gauze
Body Wrap
Wipes
Nail Wipes
Face Masks
Facial Sponges
Head & Face Rest Covers
Wands & Brushes
Mask Brushes
Needles
Bonding Treatments
Hair Mask
Hair Oils
Hair Serums
Leave-In Treatments
Scalp Treatments
Toning Treatments
Head Lice Treatment
Anti-Frizz
Curl Enhancer
Detangling
Gel
Hair Cream
Hair Spray
Heat Protection
Mousse
Setting Lotion
Volumiser & Texturiser
Wax & Pomade
Blonde Hair
Curly Hair
Dry Hair
Damaged Hair
Fine Hair
Frizzy Hair
Coloured Hair
Dandruff & Scalp Care
Heat Protection
Barber
Cushion
Detangler
Extensions
Neck
Paddle
Radial
Straightening
Teasing
Vent
WetBrush
Brush Cleaner
360
Affinage Infiniti
BLONDME
Color On
ColorDesign
Cover Line
Cristalli
De Lorenzo
Glazette
Hi Lift
IGORA
Indola
Joico
ELIXIR (Kitoko)
L'Oreal
LuminArt
Matrix
NAK
Nuance
PRAVANA
PURE
Pure Identity
Redken
Vitafive CPR
Wella
Affinage
Affinage Gloss
De Lorenzo
Hi Lift
IGORA
Indola Mousse
Joico
L'Oreal
Matrix
NAK
PRAVANA
PURE
Redken
Vitafive CPR
Wella
Adore
CHROMA ID
Crazy Color
Fanci Full
Fudge Paintbox
Goldwell Mousse
Joico Color Intensity
Joico Instatint
Punky Colour
Party Fun Hair Colour
Root Concealer
Scales & Colour Boards
Tint Brushes
Tint Bowls
Colour Whisks
Glasses & Ear Protectors
Gloves - Reusable
Gloves
Colour Remover
Colour Treatment
Foil
Tube Squeezer
Perm Solutions & Neutraliser
Perming Accessories
Perm Papers
Perm Rubbers & Rods
Cotton Wool Rope
Straightening Treatments
Tape In
Clip In
Extension Clips
Extensions Care
Brushes
Extension Tapes & Remover
Mannequins
Mannequin Clamps
T Pins
Appointment Books
Hair Donuts & Tape
Caps & Hair Nets
Cotton Wool Rope
Mirrors
Neck Wrap
Spray Bottles
Timers
Tube Squeezer
Scales & Colour Boards
Bags & Cases
Brooms
Clippers
Clipper Attachment Combs
Clipper Blades
Clipper Oil
Curlers
Hair Dryers
Hair Dryer Accessories
Straighteners
Trimmers
Hot Combs
Wall & Pedestal Dryers
Steralising
Basins - Portable
Basin Accessories
Basin Cushion
Barbers Chairs
Beds
Chairs
Shampoo Units
Stools
Colour Racks
Towel Racks
Foot Rests
Workstations
Waiting Chairs
Display Units
Mirrors
Reception Desks
Trolleys
Bags & Cases
Disinfectant
Sanitiser
Sanitiser Jars
Sharps Disposal
Gloves
Gloves - Reusable
Body Wash
Face Masks
Swabs & Gauze
Brooms
Isopropanol Alcohol
Steralising
Skin Cleansers
Skin Treatments
Moisturisers
Face & Eye Masks
Toners & Lotions
Hand & Body Lotion
Exfoliator & Scrubs
Ingrown Hair Treatment
Exfoliation Mitts & Straps
Makeup - Cheek
Makeup - Eyebrow
Makeup - Eyes
Makeup - Face
Makeup - Lips
False Lashes
Tweezers
Makeup Brushes
Makeup Sponges
Wands & Brushes
Makeup Remover
Beauty Tools
Mask Brushes
Facial Sponges
Bowls & Containers
Hot Towel Cabinets
Facial Steamers
Tweezers
Mag Lamps
Demineralised & Distilled Water
Disposable Underwear
Bras
Disposable Slippers
Body Wrap
Gloves
Bed Rolls
Bed Cover Sheets
Head & Face Rest Covers
Demineralised & Distilled Water
Wipes
Disinfectant
Sanitiser
Sanitiser Jars
Sharps Disposal
Gloves
Gloves - Reusable
Body Wash
Face Masks
Swabs & Gauze
Brooms
Isopropanol Alcohol
Steralising
Towels
Gloves
Wipes
Swabs & Gauze
Conductive Gel
Demineralised & Distilled Water
Wands & Brushes
Facial Sponges
Head & Face Rest Covers

nails
Beginner's Guide: DIY Dip Manicure at Home!
Cost of living crisis got you breaking up with your nail lady? Follow our easy step-by-step guide to DIY dip nails and never step foot in a salon again.
Your Shopping List:
- Extra Fine Nail File 240/240
- Buffing Block
- SNS Nail Dust Brush
- Pick your Cuticle Oil
- Cuticle Nipper
- Cuticle Pusher
- Pick your Dip Powder
- ProDip by SuperNail Nail Dipping System 7 Piece Professional Kit
Kit contains:
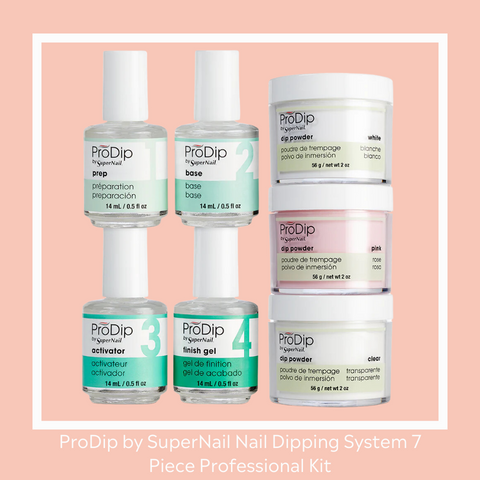
1 x ProDip by SuperNail Base 14ml
1 x ProDip by SuperNail Activator 14ml
1 x ProDip by SuperNail Finish Gel 14ml
1 x ProDip by SuperNail Nail Dip Powder - White 56g
1 x ProDip by SuperNail Nail Dip Powder - Pink 56g
1 x ProDip by SuperNail Nail Dip Powder - Clear 56g
20 x Disposable Dip Trays
30 x Wiping Sponges
Alternatively, shop from our Beginner's Dip Collection and dive into an even broader selection of products. Whether you're hunting for your go-to favourites or eager to try something new.
Steps:
- Start with clean hands and nails. Make sure you have removed any trace of existing nail polish, dip/acrylic powders, or shellac.
- Perform a dry manicure by gently pushing back the cuticle, removing the excess cuticle (pterygium) with a cuticle nipper (be extra careful with the cuticle nipper to not make yourself bleed!)
- Using the Nail File, shape the nail into your desired shape and using the Buffing Block lightly buff the shine from the nail plate.
- Remove the filing dust with a clean SuperNail Cleansing Wipe (Pro tip: Use the wipe to physically scrub the nail plate to remove all traces of oils and dust.)
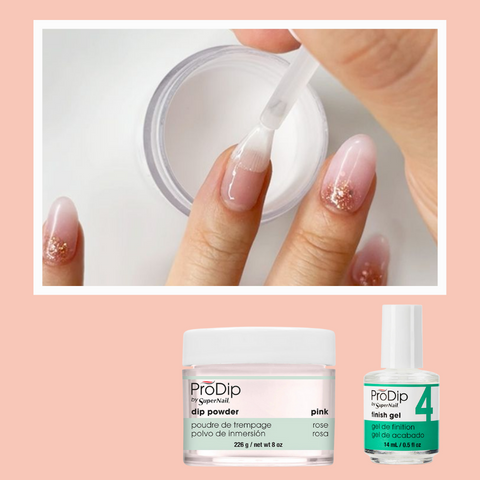
Dip Application:
- Choose your ProDip Coloured Dipping Powder and pour into disposable dipping tray.
- Apply one coat of ProDip Prep to each finger and allow it to dry.
- Apply a coat of ProDip Base to ¾ of the pinkie nail of one hand (ensuring you leave a 2mm gap at the cuticle and 1mm at the side) and carefully slide finger forward into the colour powder making sure to cover the entire nail bed. Tap off excess powder.
- Repeat the dipping process on all ten nails making sure to evenly cover the entire nail bed, then firmly close the ProDip Base cap.
- Using the SNS Nail Dust Brush, starting at the first finger you worked on, lightly dust off excess powder (away from any opened bottles of powder or base coat), don't forget underneath the nails and in the cuticles!
Final Steps:
- Apply a generous amount of ProDip Activator to all ten nails making sure to cap the free edge.
- File and shape all nails with a Nail Fil and buff smooth.
- Using a dry SuperNail Cleansing Wipe, remove dust from all nails making sure no dust particles are left on the nail.
- Re-apply the ProDip Activator on all ten nails.
- IMPORTANT: Without pausing between fingers, apply a coat of the ProDip Finish Gel to one hand only and immediately apply a second coat of ProDip Finish Gel to that same hand. Do not over brush the second coat, limit to three strokes per nail.
- Repeat the above step on the other hand.
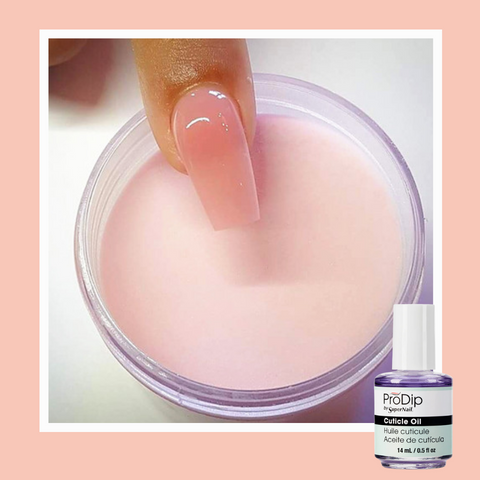
- Let the Finish Gel dry for 2 minutes before applying ProDip Cuticle Oil.
- Choosing a selection results in a full page refresh.
Quick links
Info
Our mission
We are Australia's lowest priced beauty wholesaler and home to all the in-demand products and your favourite brands. You always have peace of mind when purchasing from Le Beauty because as an official stockist, you know you are getting genuine products of the highest quality.
Follow us
!